
CBE PC-200
CBE are the company that make those very nice electrical accessories for caravans and motorhomes. Our previous caravan had been fitted with their switches and sockets so we were familiar with them and liked them. Other manufacturers made compatible fittings so we looked at what they had to offer for us.
As well as the basics, we had seen at a show in Birmingham, many motorhomes were fitted with an all-in-one LCD control panel and we liked the look. Would it do everything?
Finding out wasn't easy, CBE don't make it easy to find out about their products, but after searching the internet we located the manuals and a circuit diagram, and yes, the PC series of panels did do a lot, but also cost a bit to.
The alternative to the control panel would have been to buy a switch/fuse panel from another make, but these weren't anywhere near as sophisicated, and required a lot of wiring around the van. They also wouldn't be anywhere near as convenient to position and use.
At the time, CBE offered two systems, the PC-100 and the PC-200. The former was a fairly basic affair, with the LCD display offering a combined display of what other systems used LED's for, such as battery level traffic lights and similar for fresh water. The latter was much better, giving readouts of battery voltages, temperatures, fresh water volumes and a very useful clock, as well as a host of indicators to signal waste tank full, battery charging/status, together with the on/off switches that were needed.
So we were sold on the PC-200.
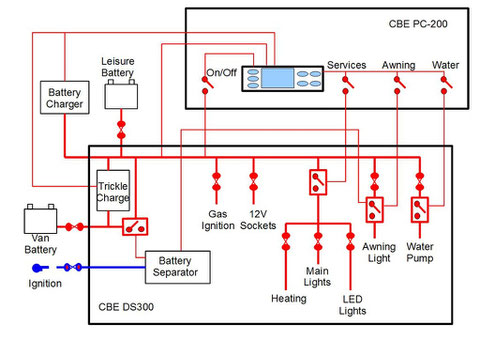
This is a basic diagram of what it does. Wiring it up can be a bit confusing due to the language of the manuals but here is my take on how to do it.
The kit is designed for commercial motorhome manufacturers who will also buy the wiring harness for their products from CBE, it's what they specialise in, and so can speed up their manufacturing by buying this kit and wiring harness and just plug it all together. Other users have to work out the wiring for themselves.
The PC-200 control panel is the big selling point and is the key part that an installer will want to position for most convenient use. Ours is next to the side door and can be seen from almost anywhere in the rear of the van, and is accessible immediately on entering the van.
The PC-200 has a connection to the main switching box, the DS300, which is a long multiway cable but the two must be able to connect, I don't recommend trying to change the length of this cable so be prepared to coil it up somewhere if too long.
The PC-200 also has two other connections, the temperature gauges, which plug directly into the rear of the panel, one for use inside, and a sealed one for use outside. They come with a reasonable length of cable, I positioned the inside one very close to the panel, the outside one I routed out of the van via an existing gap in the bodywork.
That's it for the PC-200 panel, all the real work happens with the DS300 but I'll mention the mains first to get it out of the way.
Three mains components were included in my kit, an MCB/RCD unit, a mains battery charger and a covered molex plug box. As with other parts, this is meant to be plug and go for commercial manufacturers but we had to think about this ourselves.
The MCB/RCD is fairly standard and was wired up to the wired up to the EHU socket via conduit enclosed 25A cable. The earth was run out to a very obvious chassis connection on the van.
We used the supplied molex junction box but it's worthwhile considering a household distribution box. Three CBE UK mains sockets were fitted in the van, with backboxes on the sockets, and routed back to the junction box. The molex plugs for this are provided but have to be wired up correctly, the sockets are keyed but the wiring is your own responsibility.
The mains battery charger came with cables and plugged into the distribution box. It also has to connect to the DS300 but more of that now.
The DS300, battery charger, mains distribution and 12V batteries were located together.
The batteries were separately connected to a switch/fuse box with the recommended 50A fuses fitted. From this fuse box, a single feed was run to the DS300 leisure (services) battery connection. The negative from teh batteries was routed to the negative connection on the DS300 and to a large chassis connection.
A large gauge cable was fitted to the DS300 van battery connection and routed to the van battery via a switch and fuse. A separate cable is run from either the van ignition, or preferably the van D+ alternator signal, to the DS300 and connects via a plug it shares with the mains charger. Even if the van battery isn't connected, it's important to fit the ignition/D+ signal if some of the automatic features are going to be used.
The battery charger is connected to the same terminals on the DS300 as the leisure battery is and also has a single wire connecting to the DS300 which indicates that the mains is connected and that the battery is charging. It shares the plug for this connection with the van ignition/D+ signal.
The PC-200 connects to the DS300 via a multiway plug inside, once the panel and the batteries are connected then the system should power up and the display on the PC-200 working. Starting the van engine will also start charging the leisure battery and a indicator on the PC-200 will show this. If the temperature gauges are connected then they will be working, as will the clock and voltage gauges. Connecting the mains should also now show up on the panel.
If the CBE fresh and waste water gauges are being used then the cables for these have to be routed back to the DS300 and they should already be fitted with plugs.
The CBE fresh water tank probe has to be calibrated by the supplier, I've never found instructions for this. The waste water probe consists of two connections fitted through the wall of the waste tank at the height you want to consider 'full', and basically detect 'full' when the water reaches both of them. The PC-200 beeps and flashes a warning when this happens.
The rest of the connections are run via three molex connectors which aren't very useful for DIY builders. First off, all the negative returns are routed to one molex connector which connects to the battery negative. I don't recommend you use this, but instead either route the cable to a common negative busbar, and then to the battery, or connect the negative to a nearby chassis connection. Otherwise you may end up with up to 12 extra wires going to the DS300 which don't add any extra benefit. If you're a commercial builder this is great, just one plug all done, but then you're also paying someone to do all the work beforehand.
The DS300 has a fuse and connection for solar power which I used initially but have since moved to a direct fused connection to a leisure battery busbar. This is just extra wires into the DS300 and doesn't offer any benefit.
There is a connection for switching a three way fridge automatically to 12V when driving and typically the gas is switched off. This can be used with a small jumper cable for fitting a compressor fridge but when we tried this is wasn't very reliable, so we wired the fridge via a switch and fuse to the battery positive busbar. There's a section on the website about our adventures with fridges which goes into detail about this.
The DS300 has a connection to an electric door step, something I didn't fit, but which if used will automatically retract when the engine is started.
There's a fused connection for a 12V feed to the electric hob/oven ignition which we used.
We used the fused connection for the heating, which is switched via the main on/off switch on the PC-200 panel.
The water pump is connected on the DS300, and is switched on/off by a separate switch on the PC-200 panel. It's always worked ok but we do sometimes get the 12V lights flashing when the pump is running.
We fitted an over door/awning light, switched from the control panel and has its own fused connection on the DS300. This light automatically switches off when the engine is running.
There are two separately fused lamp circuits which are powered by the main on/off switch. We wired one circuit to the left of the van, the other to the right. We also wired in the 12V cigar lighter sockets to these circuits.
Overall, we still use the PC-200 kit for many items but have routed the solar charging and fridge supply separately.